Getting Started
How to access and navigate the PaulRentACar CRM
This guide walks you through logging in, navigating the interface, understanding the dashboard, and completing your first tasks in the PaulRentACar CRM.
Accessing the Platform
Open your web browser and navigate to your organization's CRM URL. You will see the login screen.
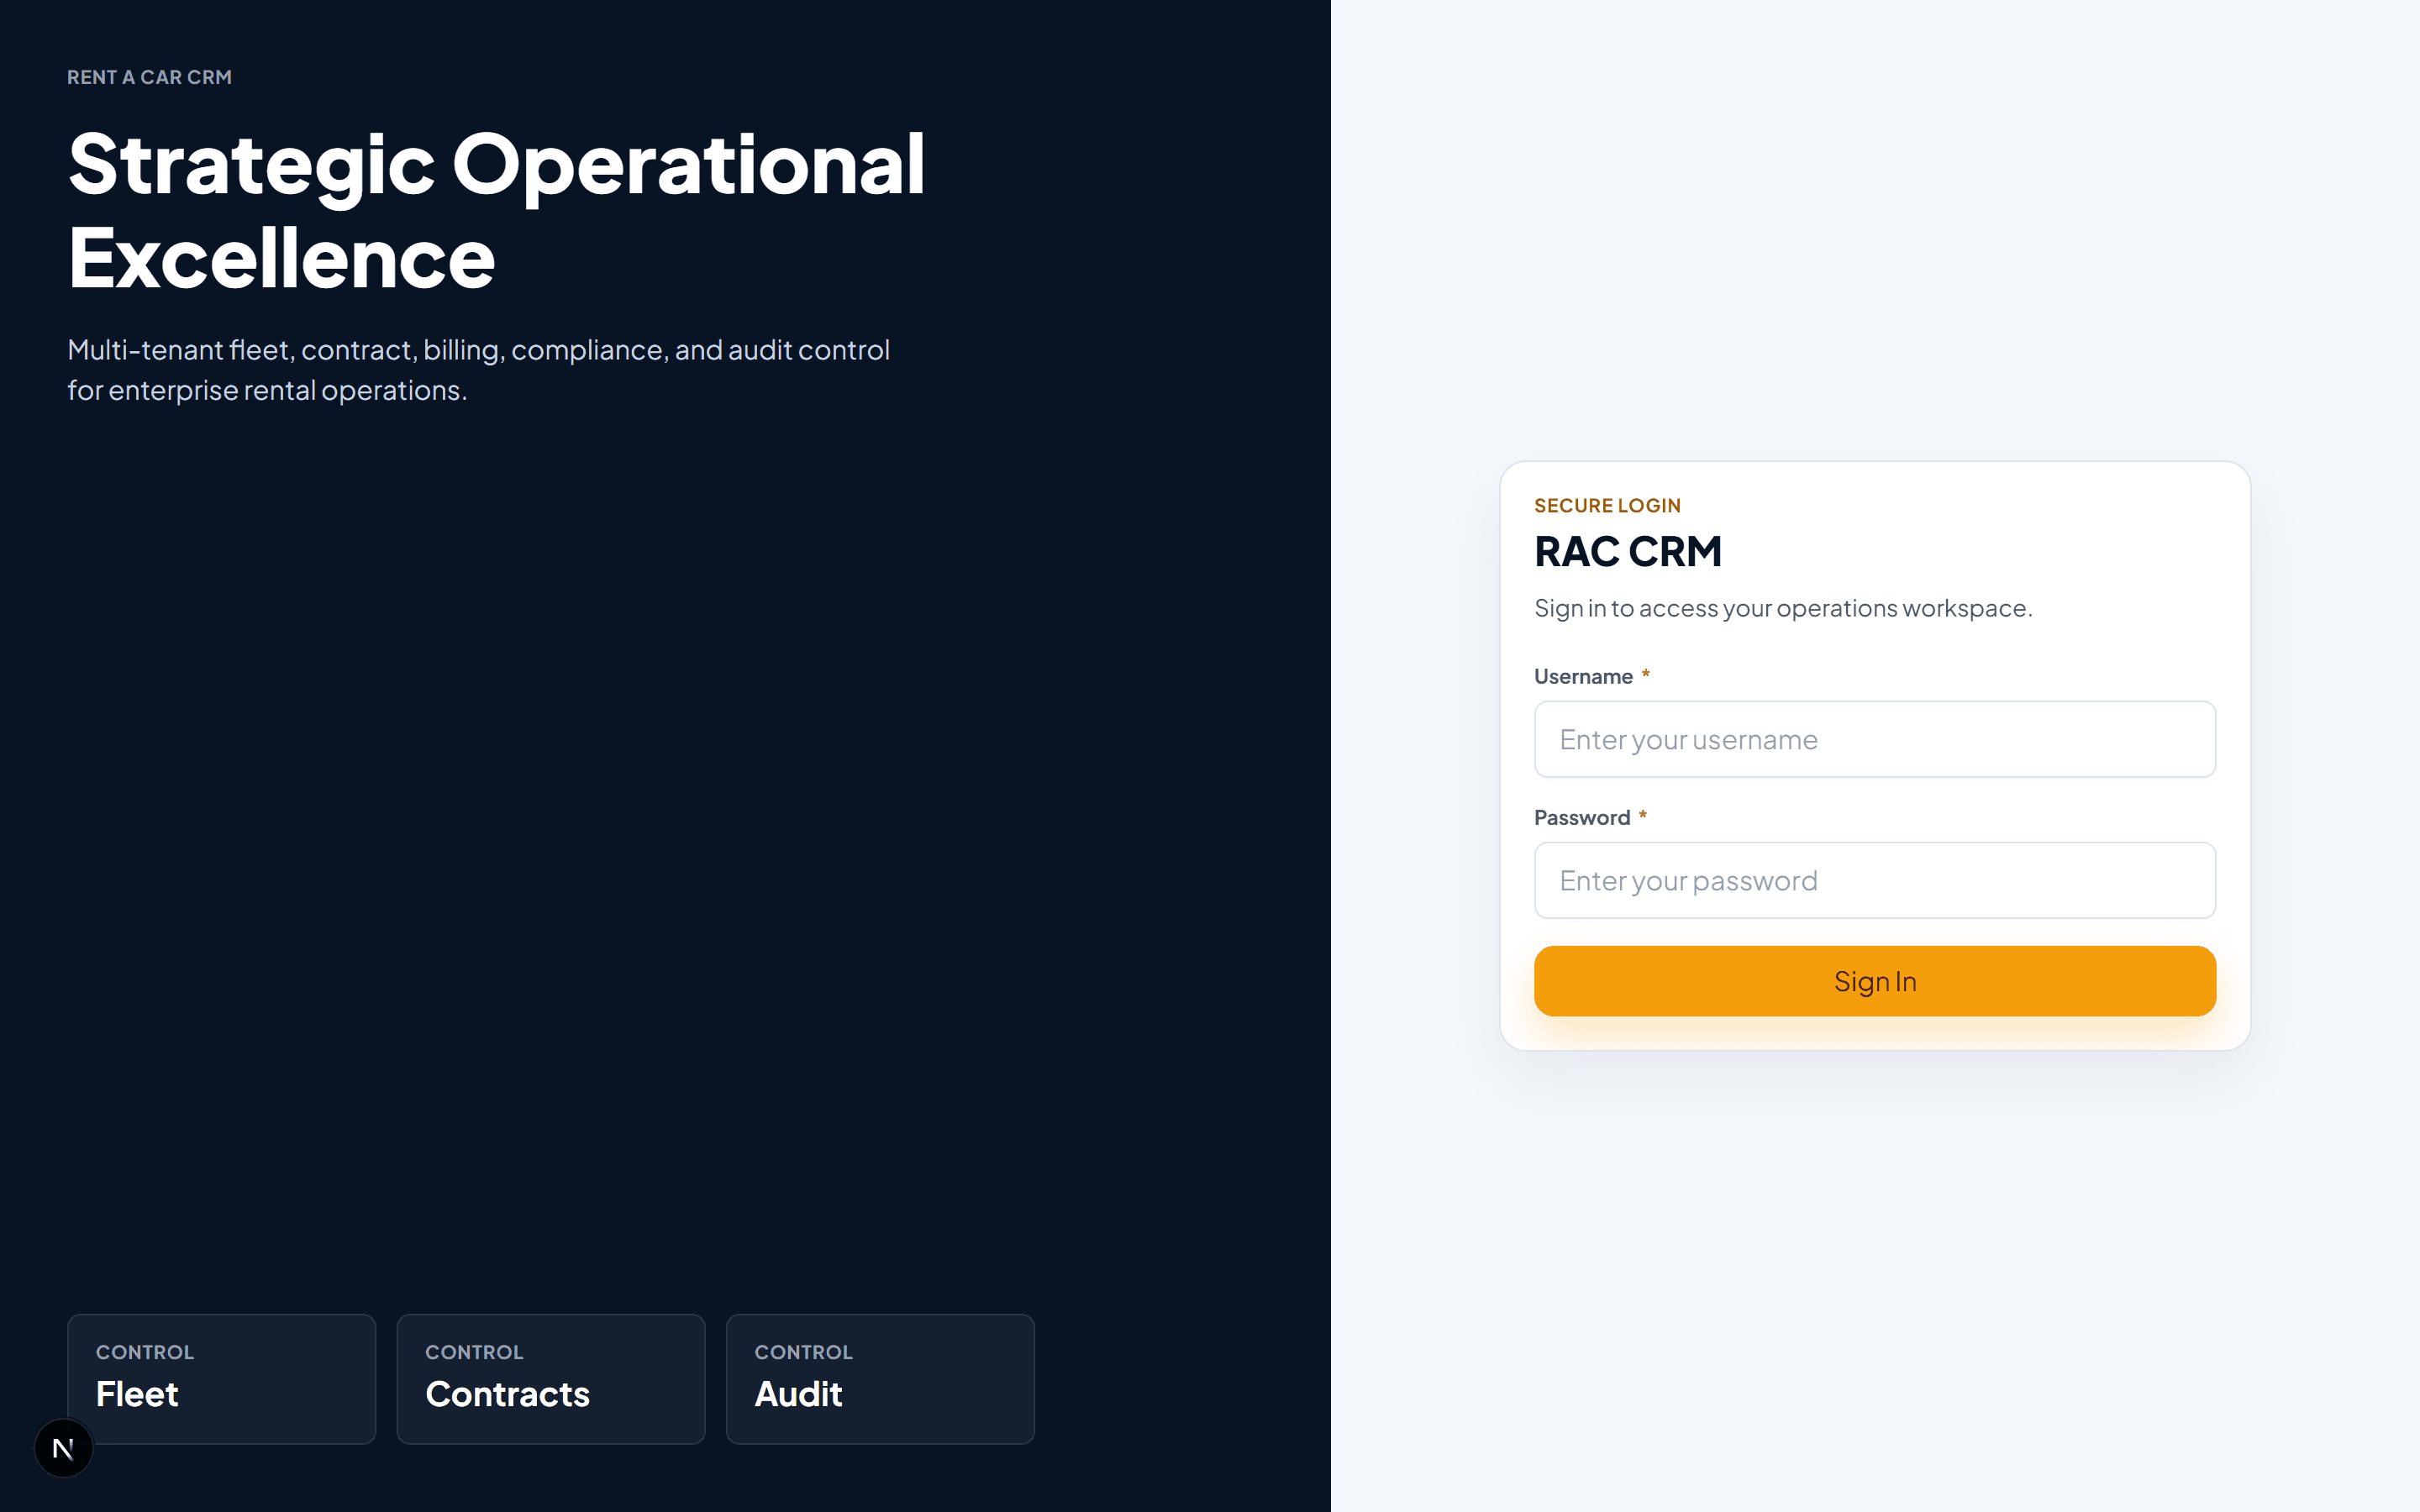
The login screen — enter your credentials provided by your system administrator.
System Requirements
| Requirement | Details |
|---|---|
| Browser | Chrome 90+, Firefox 90+, Edge 90+, or Safari 15+ |
| Resolution | 1280×720 minimum; 1920×1080 recommended |
| Internet | Stable connection required; no offline mode |
| Cookies | Must be enabled for session management |
Logging In
- Enter your Email / Username (provided by your system administrator)
- Enter your Password
- Click Sign In
Upon successful login, you will be directed to the main dashboard.
First time users: Your administrator will provide your initial credentials. You will be prompted to change your password after first login. If you forget your password, click "Forgot Password" on the login screen to request a reset link.
Understanding Login States
| State | What Happens |
|---|---|
| Successful login | You are redirected to the dashboard. An access token and refresh token are stored securely. |
| Invalid credentials | An error message appears: "Invalid email or password." No details about which field is wrong are shown for security. |
| Account deactivated | You will see: "Your account has been deactivated. Contact your administrator." |
| Session expired | You are redirected to the login screen with a message: "Your session has expired. Please log in again." |
| Token refresh | Your access token is refreshed silently in the background. You will not notice this unless a refresh fails, which redirects you to login. |
Navigating the Interface
The CRM interface consists of three main areas:
The three-panel layout — sidebar on the left, content area in the center, and header bar at the top.
1. Sidebar Navigation
The dark sidebar on the left provides access to all modules, organized by business domain. Sections with a > arrow expand to show sub-modules. Modules you do not have permission to access are hidden entirely.
| Section | Modules |
|---|---|
| Fleet Operations | Customers, Drivers, Vehicles, Leads, Quotes, Reservations, Contracts |
| Operations | Unassigned Vehicles, Cancellations, Delivery, Collection |
| Financial | Invoices, Traffic Fines, Salik Charges, Damage Recovery |
| Compliance | Complaints, Compliance Tasks, Legal Cases, Corporate Accounts |
| Administration | Users, Roles, Permissions, Tenants, Branches, Workflows, Pricing |
| Workflow | My Tasks, Approvals |
| Insights | Reports (Executive, Operations, Fleet, Finance, Sales, Risk) |
Use the search bar at the top of the sidebar to quickly jump to any module by name. Type a few characters and matching results appear instantly.
2. Header Bar
The header bar sits at the top of the screen and contains:
| Element | Purpose |
|---|---|
| Tenant / Branch Selector | Switch between tenants or branches you have access to. The current selection filters all data below. |
| Global Search | Search across customers, vehicles, contracts, reservations, and invoices from one input. |
| Notifications Bell | View pending tasks, SLA warnings, approval requests, and system alerts. |
| User Avatar / Name | Click to open the profile menu with settings, password change, and sign out. |
3. User Profile
Your name, role, and assigned branch appear in the sidebar footer and in the header profile menu. From here you can:
- View your profile details
- Change your password
- Sign out of the session
4. Content Area
The main content area displays the selected module's content — list views, forms, detail panels, or dashboard widgets depending on the context. Most list screens follow a consistent pattern:
- Page header with title, description, and action buttons
- Filter bar with status and date range filters
- Data table with sortable columns, status badges, and row actions
- Pagination with record count and page navigation
Dashboard Overview
The dashboard is your command center. It provides a real-time snapshot of operations across all branches you have access to.
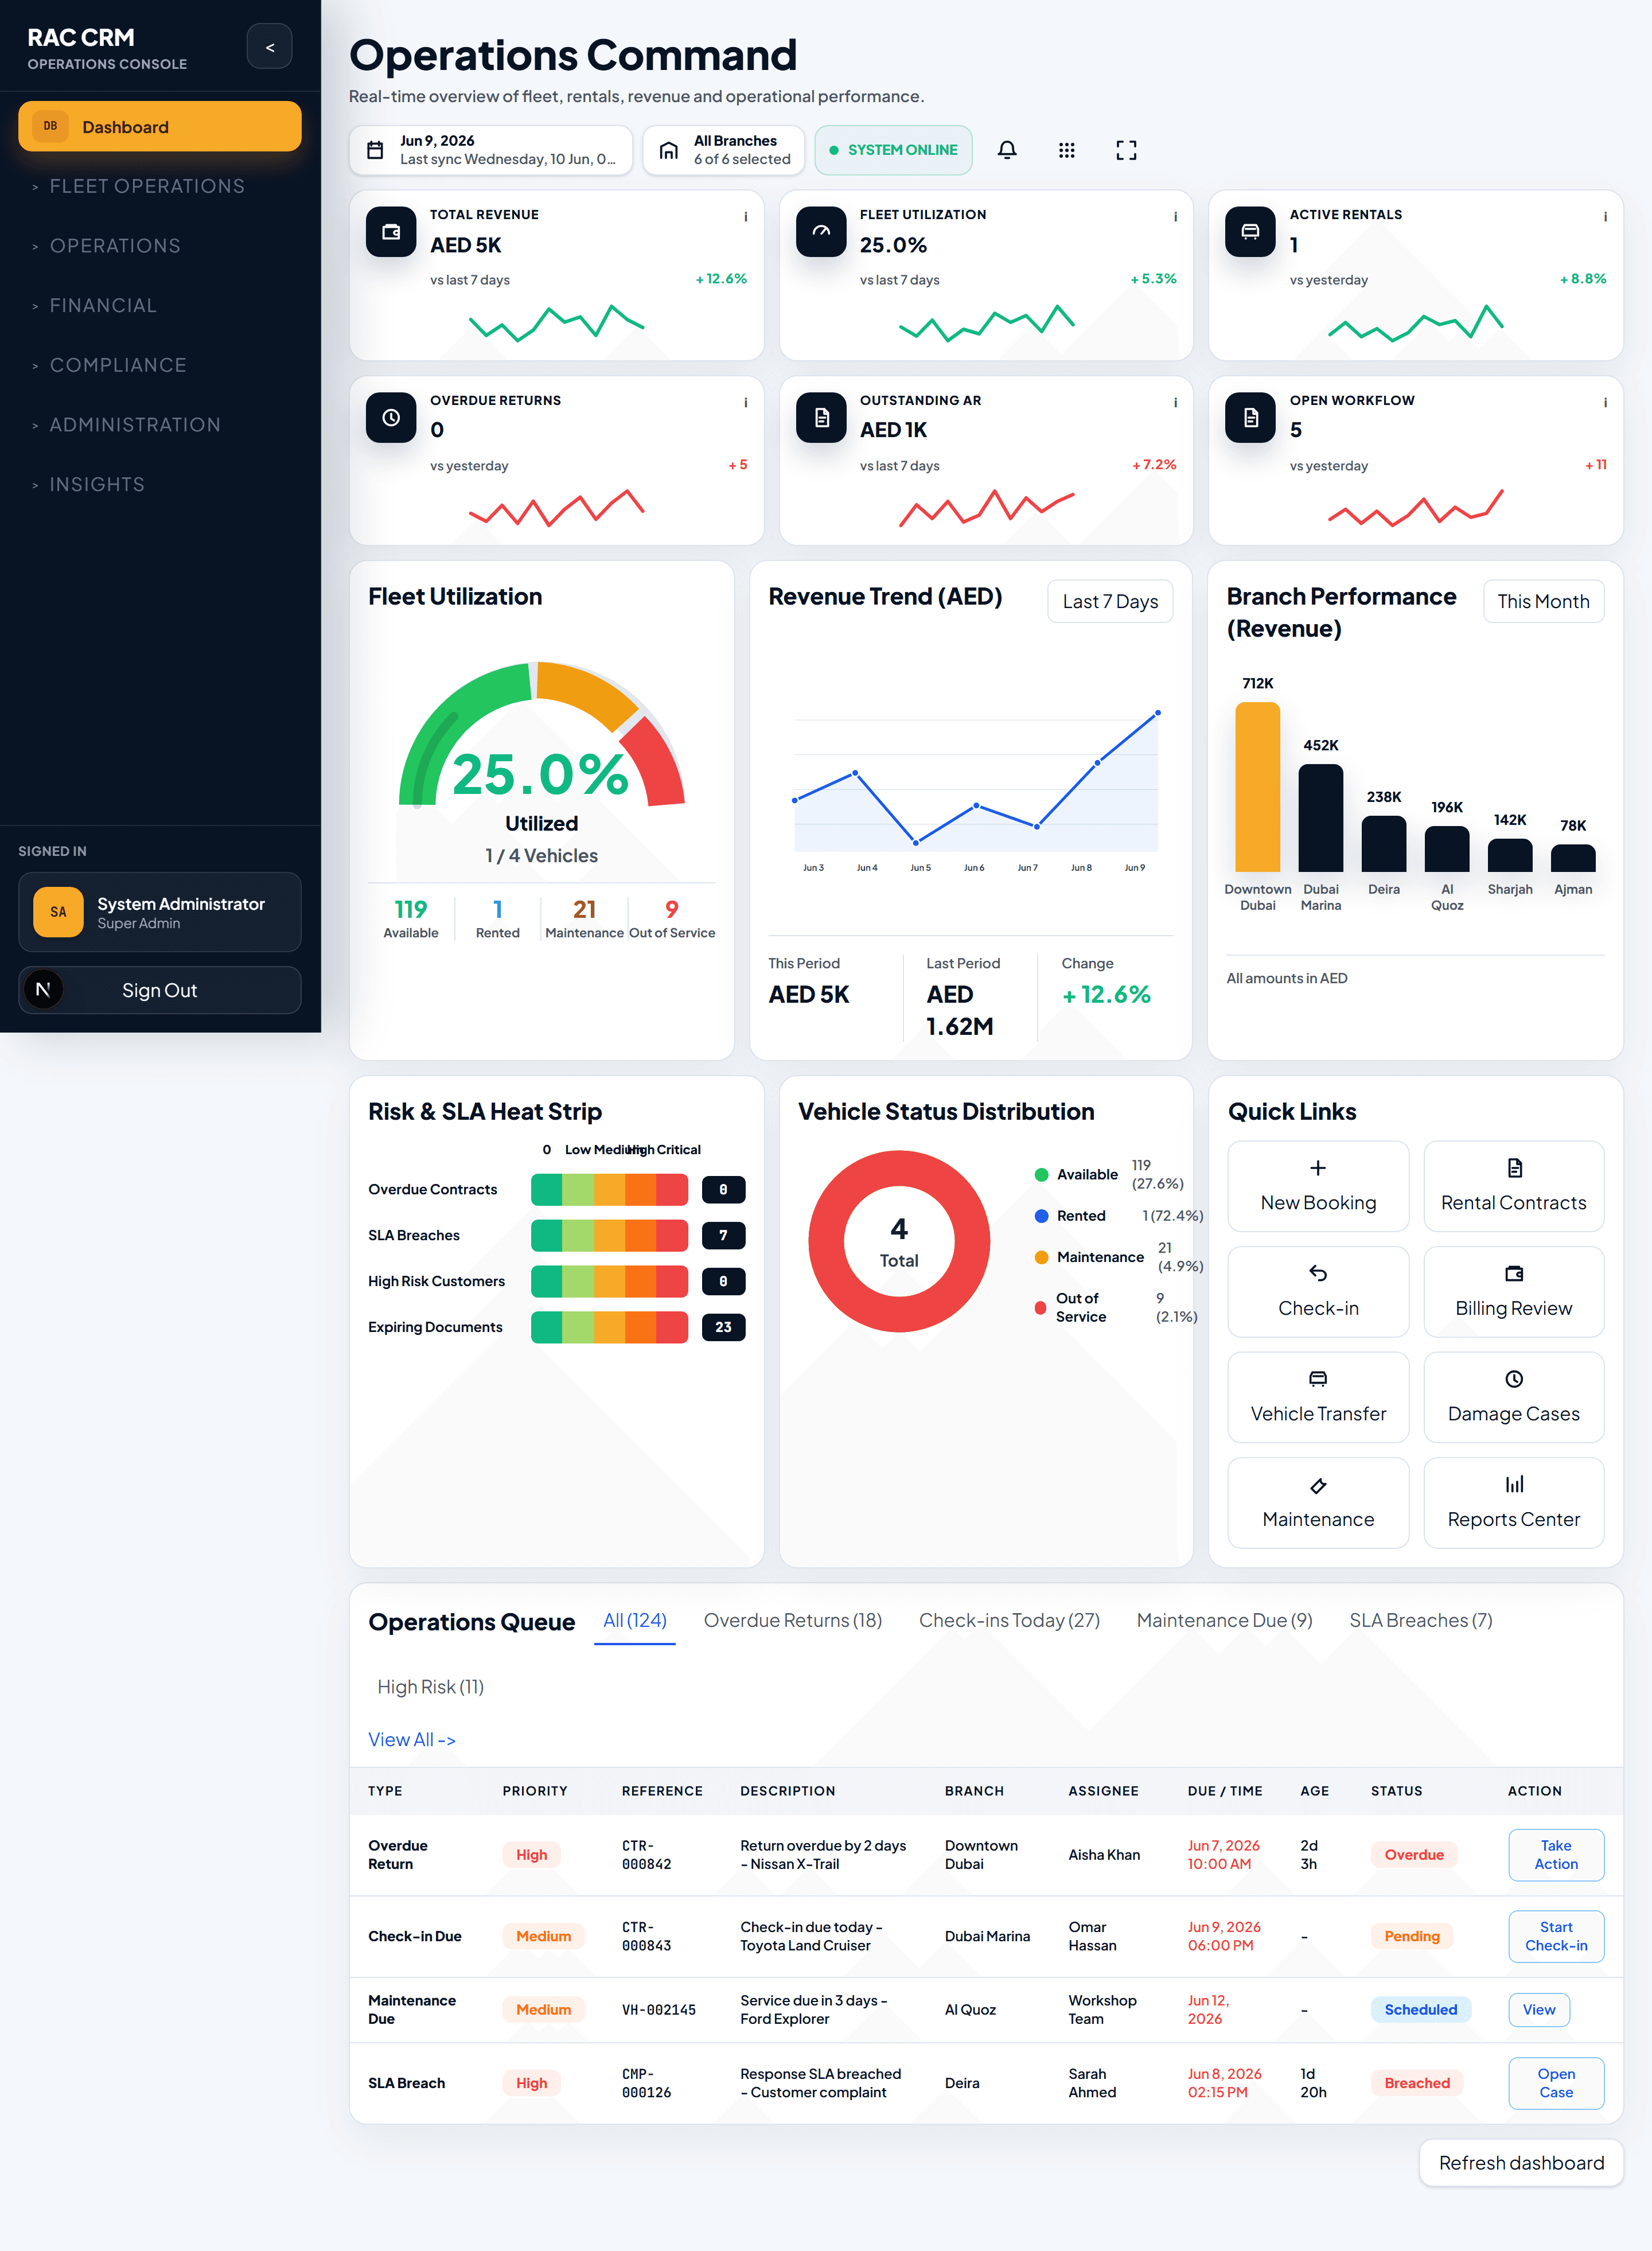
The executive dashboard — KPIs, fleet status, financial summary, and operational alerts.
Key Performance Indicators
| KPI | What It Shows | Updates |
|---|---|---|
| Today's Bookings | Number of reservations confirmed for today | Real-time |
| Active Rentals | Vehicles currently checked out to customers | Real-time |
| Available Fleet | Vehicles in "available" status across all branches | Real-time |
| Pending Check-ins | Contracts due for return today or overdue | Real-time |
| Daily Revenue | Total invoiced amount for today | End-of-day rollup |
| Outstanding Balance | Total unpaid invoices across all customers | Real-time |
| Pending Approvals | Workflow items waiting for your approval | Real-time |
| SLA Warnings | Tasks or complaints approaching SLA breach | Hourly check |
Dashboard Sections
| Section | Content |
|---|---|
| KPI Cards | Top-row summary cards with key metrics and trend indicators |
| Fleet Status | Pie or bar chart showing vehicle status distribution (available, reserved, rented, maintenance, damaged) |
| Revenue Trend | Line chart of daily/weekly/monthly revenue over the selected period |
| Recent Activity | Timeline of recent contract check-ins, check-outs, payments, and status changes |
| Operational Alerts | List of overdue returns, approaching maintenance, expired documents, and SLA warnings |
| Top Branches | Performance comparison across branches (revenue, utilization, bookings) |
Branch managers see branch-scoped data by default. Regional or head-office users can switch the branch selector to "All Branches" for an aggregated view.
Common First Tasks
Use this checklist to get familiar with the platform. Each task is linked to the relevant module documentation.
Day 1 — Orientation
- Log in and confirm your profile details are correct
- Change your password from the default
- Explore the sidebar — expand each section to see available modules
- Review the dashboard KPIs and alerts
- Use the branch selector to switch between branches (if you have multi-branch access)
Day 2 — Core Operations
- Add a new customer — Navigate to Customers → Add Customer, fill in profile and upload a document
- Create a reservation — Navigate to Reservations → New Reservation, select a customer and vehicle
- Check out a vehicle — From a confirmed reservation, create a contract and complete the checkout inspection
- Process a return — From an active contract, complete the check-in inspection and finalize billing
Day 3 — Financial & Compliance
- View an invoice — Navigate to Invoices, open an invoice, review line items
- Record a payment — From an invoice, click "Record Payment" and enter payment details
- Log a complaint — Navigate to Complaints → New Complaint, assign to the appropriate team
- Check your approvals — Navigate to Workflow → Approvals, review and act on pending items
Week 1 — Advanced
- Run a fleet utilization report from Reports → Fleet
- Review your pending tasks in Workflow → My Tasks
- Explore the pricing configuration in Administration → Pricing
- Review audit logs for your recent actions
Common Workflows at a Glance
| Workflow | Entry Point | Typical Steps |
|---|---|---|
| New Rental | Reservations → New Reservation | Create reservation → Confirm → Assign vehicle → Checkout → Active rental → Check-in → Close |
| Walk-in Customer | Customers → Add Customer | Create customer → Create reservation → Immediate checkout → Active rental |
| Vehicle Return | Contracts → Active Contracts | Select contract → Check-in inspection → Damage assessment (if any) → Final invoice → Close |
| Complaint Handling | Complaints → New Complaint | Log complaint → Assign owner → Investigate → Resolve → Close |
| Maintenance | Vehicles → Select Vehicle → Request Maintenance | Submit request → Approve → Workshop repair → Complete → Vehicle available |
Keyboard Shortcuts
| Shortcut | Action |
|---|---|
| Escape | Close modals, dialogs, and dropdowns |
| Enter | Submit forms and confirm actions |
| Tab | Move to the next form field |
| Shift + Tab | Move to the previous form field |
| Ctrl + / | Open global search (where supported) |
Need Help?
| Issue | What to Do |
|---|---|
| Cannot log in | Verify your credentials with your administrator. Check that Caps Lock is off. |
| Module not visible | Your role may not have permission. Contact your administrator to request access. |
| Data looks wrong | Check the branch selector — you may be viewing a different branch's data. |
| Screen not loading | Clear your browser cache. Try an incognito/private window. |
| Technical issue | Report to your IT support team with a screenshot and the time the issue occurred. |
| Feature question | Refer to the relevant module section in this documentation for step-by-step guidance. |
For account creation, password resets, and permission changes, always contact your system administrator. These changes cannot be made through the documentation site.
What's Next?
Now that you are oriented, explore the specific modules relevant to your role:
- System Architecture — Technical overview for developers and IT staff
- Fleet Operations — Customer, driver, and vehicle management
- Business Processes — Leads, quotes, reservations, and contracts
- Financial — Invoicing, payments, fines, and accounting
- Compliance — Complaints, legal cases, and corporate accounts
- Administration — Users, roles, permissions, and system configuration